You need to follow a precise workflow in order to back up Active Directory. Use our plan.
This post covers the procedures and recommendations for performing a manual backup of Active Directory (AD) data or a scheduled system-wide backup of Windows Server, which includes Active Directory data. You will learn the best practices to implement in order to reduce the risk of failure to your system and enable fast recovery from disaster.
Recovering from a disaster is only possible if you already have all of the elements in place to recover lost data from backups. You need to ensure that you are also covered in case there is a problem with the backup copy of your Active Directory system.
We are going to look at three methods that you can use in order to backup Active Directory.
- Automated system temporary storage
- Full backup
- System state backup
Here are explanations for each of these.
Automated system temporary storage
Windows Server will automatically save any entries that you delete from your Active Directory structure. This is the Recycle Bin that operates for other systems on your server, such as deleted files and directories.
If you discover that you made a mistake by deleting items for Active Directory, you can just restore them from the Recycle Bin. This service won’t help you if you overwrote an option with incorrect data and can’t remember the state that it was in before you made the changes.
Full backup
When technicians refer to a full backup, they mean a full backup of the entire server, not just the Active Directory domain controller. This even includes the operating system. The purpose of this full backup is so that you can reinstall everything onto a bare metal server in the event of a disaster that completely ruins the physical server and you have to transfer to another site or replace a broken server.
Another purpose of a full backup is to recover from malware attacks that cannot be removed, such as a worm that gets into the kernel, or a ransomware attack.
System State Backups
A system state backup focuses on individual applications and their data. You will likely perform system state backups for many different applications on your server, such as databases. If you are part of a large organization, then you might only be responsible for part of the system. In this case, you would be responsible for maintaining Active Directory while others would have the role of protecting network configurations, databases, and other such applications.
In a system state backup of Active Directory, you are only interested in backing up the objects that you have entered into your Active Directory domain controller, not the entire environment. The assumption is that this type of backup would occur if a hacker destroyed all or some of the entries in your DC and also emptied out the Recycle Bin.
In all of the various scenarios where it could be necessary to restore from a system state backup, you should assume that the settings of the domain controller will be unaltered. It would also mean that you can reinstate those settings quickly, either through an automated configuration restorer or through manual processes.
This strategy is suitable for restoring data back to its original domain controller. It isn’t a method that can be used to migrate domain controllers or restore to a new instance.
The data that you will need to back up includes:
- System startup files
- System registry
- Active Directory database and related files
- Sysvol
- Group policies
- DNS zones and records
- Com+ Class registration database
These elements would all be backed up individually, so just a part of the system could be restored where necessary. This strategy does create some duplication of effort. For example, group policies are included in the sysvol, so you would be backing up that data twice. However, it is possible to manage group policy backups from the Group Policy Management Console, so it would be better to have processes in place within that menu. This would allow you to just restore the policies on demand without having to restore all of the sysvol data.
Policy data is also included in the sysvol backup, but backup from the Group Policy Management Console as well.
Active Directory backup strategies
Create a backup plan that lays out your backup strategy. This will include your option over when to back up and how and the working procedures you will follow in order to backup AD and restore it completely, or in part.
Consider the following:
- Document your Active Directory environment, backup policy, and disaster recovery plans.
- If you populate your database with scripts, store them in an archive so that you can use these as an option to repopulate the AD structure.
- Integrate the Tombstone into your strategy. This is the Recycle Bin for Active directory and it retains deleted objects for 60 days. It is a valid backup and recovery service.
- Have multiple domain controllers because that gives you a failover system in case one instance becomes damaged or unavailable.
- Backup AD at least once a day. If you manage a large system that has frequent AD changes, then back up twice a day.
- Backup to the cloud rather than onsite to insure against a site-wide disaster.
- Backup two domain controllers in each domain – one of these should have the Flexible Single Master Operation (FSMO) role.
Once you have an idea of what paths you will follow to back up and restore Active Directory, you can move on to acquiring all of the necessary resources and setting up the utilities that will support your strategy.
Install Windows Server Backup
There are backup utilities available on the market. However, the Windows Server Backup feature is built into Windows Server and was written specifically to handle Windows utilities, such as Active Directory. Furthermore, it is free to use. Many commercial tools are just interfaces through to this utility, so if you decide to buy in a better system you will still need to have Windows Server Backup activated.
The backup feature is available in Windows Server 2016 and later. You find it in the Server Manager Dashboard. So, go to the server that you host AD on and access the Server Manager from the Start menu.
In the Dashboard, select the Local Server in the left panel menu and then click the Manage menu in the top menu ribbon. Select Roles and Features from the drop-down menu. This starts up the Add Roles and Features Wizard.
For Installation Type, select the Role-based or feature-based installation radio button. Click the Next button. In the Select Server screen, choose the Select a server from the server pool option and select your AD hosting server from the list shown. Click Next. Click Next again to pass through the Server Roles screen – we want to get to the Features page.
In the Select Features screen, scroll down the list of available features and click on Windows Server Backup. Click on the Next button. The next screen asks you to confirm your request. Make sure that Windows Server Backup is shown as the feature to create and then press the Install button at the bottom of the screen.
Wait for the installation progress bar to fill up. Click on the Close button once it is reported that the installation has completed.
Set up an automated full server backup
A full server backup is the first of your two options for backing up Active Directory – the other is a system state backup. The full server backup will protect all of your applications and data, not just Active Directory, and actually also includes a system state recovery option, so it creates a backup for both strategies.
You need to configure the backup system so that it will implement your backup strategy. Mount a remote drive, such as a cloud server, as a local drive. One quirk of the backup system is that the backup drive cannot be larger than the disk you will be restoring to, so keep that in mind when ordering and organizing your cloud storage system.
Windows Server Backup performs one complete backup and then implements incremental backups thereafter. So, your first backup process will not be representative of the time it takes to backup on a regular basis.
Configure Windows Server Backup
- While in the Server Manager Dashboard, click on Tools in the top menu ribbon and then select Windows Server Backup from the drop-down list.
- The main screen of the Windows Server Backup utility shows backup activity but as you haven’t set anything up yet, all the fields in this screen will be empty. Click on Local Backup in the left-hand panel and click on Backup Schedule in the right-hand Actions panel. Click on Next in the main screen. In the Select Backup Configuration section, choose Full server.
- Under this option, you will see how large the backup size will be. If the backup disk you chose doesn’t have enough space for this, click on Cancel, select a different disk, or alter the size of the drive, and then start the Windows Server Backup configuration process again.
- If the space that the backup service requires is available, click on the Next button. The next screen lets you select items for backup. It includes an Advanced Settings button. Click on it. In the Advanced Settings section, choose the VSS Settings tab – “VSS” stands for “Volume Shadow Copy Service.” Activate the VSS full backup radio button. Click on OK to close this section.
- The next screen lets you specify your backup schedule. If you are creating daily backups, choose the Once a day radio button and select a time of day from the associated drop-down list. If you are going to run backups twice a day, choose the More than once a day radio button. In order to schedule both times, select one hour of the day from the left-hand list in this section by clicking on it. Click on the Add button to see that time appear in the right-hand panel. Scroll down in the left-hand list to find the other hour of the day that you want backups to run, click on it, and press the Add button.
- Once you have specified the backup frequency and time, click on the Next button at the bottom of the screen.
- The next screen is Specify Destination Type. From the options presented here, choose Backup to a volume. *
- Click on Next to get to the Confirmation screen. Check the settings listed in this screen and then click on the Finish button.
You now need to look at the scheduled task. Type Task Scheduler in the Start menu search field and select the Task Scheduler app from the results screen.
- In the left-hand panel, expand the folders so that you can see the list of contents in the Windows folder, which is under Microsoft in the main Task Scheduler Library list. Select Backup.
- You should see one task listed in the main panel of the scheduler screen. Double-click on it. This leads to a tabbed interface.
- On the General tab, look for the Security options section. Make sure that the backup service is using the SYSTEM account. If it isn’t, click on the Change user or group button and set it so. Make sure that the Run with highest privileges box is checked and check that Configure for: is set to Windows Server.
- Click on the Settings tab. Check the Allow task to be run on-demand box and make sure that the Run task as soon as possible after a scheduled start is missed is activated.
- Click on the Stop the task if it runs longer than: box. This option is a failsafe in case something goes wrong and the process runs forever. It is better to get the Windows Server Backup system to unwind the process than to kill it. Set the allowed duration time to two hours. Also, the option, If the running task does not end when requested, force it to stop should be activated. Click OK to save these changes and close the schedule task Advanced Settings screen.
* In the Specify Destination Type screen, you will see the option to backup to a shared network folder below this. As you will be using a remote storage system, you might think that this option is more appropriate for you. Don’t go for the network folder option – you have the remote drive mounted as though it were a local volume, so you can use the local backup process here. The shared network folder option won’t perform incremental backups, but runs a full backup every time. That’s time-consuming and unnecessary and it could be the reason why some technicians don’t like using this native backup system.
Running an automated full server backup
As the settings you created allow the task to be run on demand, you have the option to make the first run of the backup service run while you are in the office. You could also just work late and wait for the scheduler to kick off the backup process, if you want to run the service on demand. Go to the backup schedule entry in the screen where you selected the Advanced Settings button. Instead of clicking the button, right-click on the task and choose to run it.
The benefit of setting up a scheduled task instead of just running the service as a one-off is that the scheduled system deploys incremental backups in a cycle of one full backup followed by 14 incremental backups. Once 14 incremental backups have been performed, it will perform a new full backup and start the incremental count again. If you request that the process runs immediately within the Task Scheduler environment, the service will still stick to that sequence of full and incremental backups.
Once the first backup run has completed, you will be able to see details of the process in the home screen of the Windows Server Backup’s Local Backup section that you first accessed in order to set up the schedule.
Set up and run a system state backup manually
There might be reasons that you don’t want to or can’t run backups regularly on a schedule and want to launch them manually instead. If this is the case, then you still need to set up the backup process in the Windows Server Backup utility.
In order to create a manual process to backup Active Directory:
- Go to the Server Manager Dashboard, click on Tools in the top menu ribbon and then select Windows Server Backup from the drop-down list.
- Click on Local Backup in the left-hand panel and then select Backup Once, in the right-hand Actions list.
- In the Backup Options screen, the Different options button will be automatically selected because the scheduled option is not available. Click on Next.
- The Select Backup Configuration screen is where you can choose between a full backup or a system state backup. The system state backup option is shown as Custom in this screen. Select this radio button. If you are operating this manual procedure, it is possible that you are only concerned with making a separate backup of essential data files to store in a new location because you already have a full server backup running on a schedule.
- No requirements will appear in the Select Items for Backup screen. Click on the Add Items button. In the Select Items overlay, check the System state box. Click on OK to return to the main screen. Now, there is an item in the requests box, which is the System state option.
- Click on the Advanced Settings button. Click on the VSS Settings tab and select the VSS full backup radio button. Click OK to close this overlay window. Click on the Next button.
- In the Specify Destination Type screen, select Local Drives and click on the Next button. This takes you to the Select Backup Destination section. Select your preferred disk for the backup storage. Click on Next.
- The final part of this process is the Confirmation screen. Click on the Backup button to start the backup running.
You can watch messages appear in the Back Progress screen. However, the process will keep running in the background if you press the Close button. You will see a report on the process in the Local Backup home screen once the backup has completed.
About the system state backup
One good reason to run a system state backup is if you are about to make a lot of changes to your records in Active Directory. Another good reason is if you want to make a bulk upload and you are nervous about not being able to unpick all of those additions if they don’t turn out right.
In these instances, making a local copy of system files will enable you to wipe out your changes and go back to the original state. Remember, the Tombstone service will enable you to restore deleted items. However, this is no help if you end up wanting to identify new but faulty AD records.
The Windows Backup system state option will back up the following data stores:
- Windows System Registry
- Performance Counter Configuration
- Component Services Class database
- Boot and system files
- Sysvol file
- Active Directory database
- Certificate Services
Be careful about running a backup and restore of these values during the day. If you work as part of a team of technicians, restoring from a system state backup so that you can rollback your own unsuccessful changes in Active Directory would also wipe out the work of some other technician who is also working on the system.
Check with colleagues before creating a backup image so that rolling back to it doesn’t interfere with their work.
Third-party tools for Active Directory backup
ManageEngine AD360 (FREE TRIAL)
As with most areas of IT management, there are automated tools available from a number of suppliers for backups in general and AD backups specifically. An example of this field of IT management automation is provided by ManageEngine in its AD360 package.
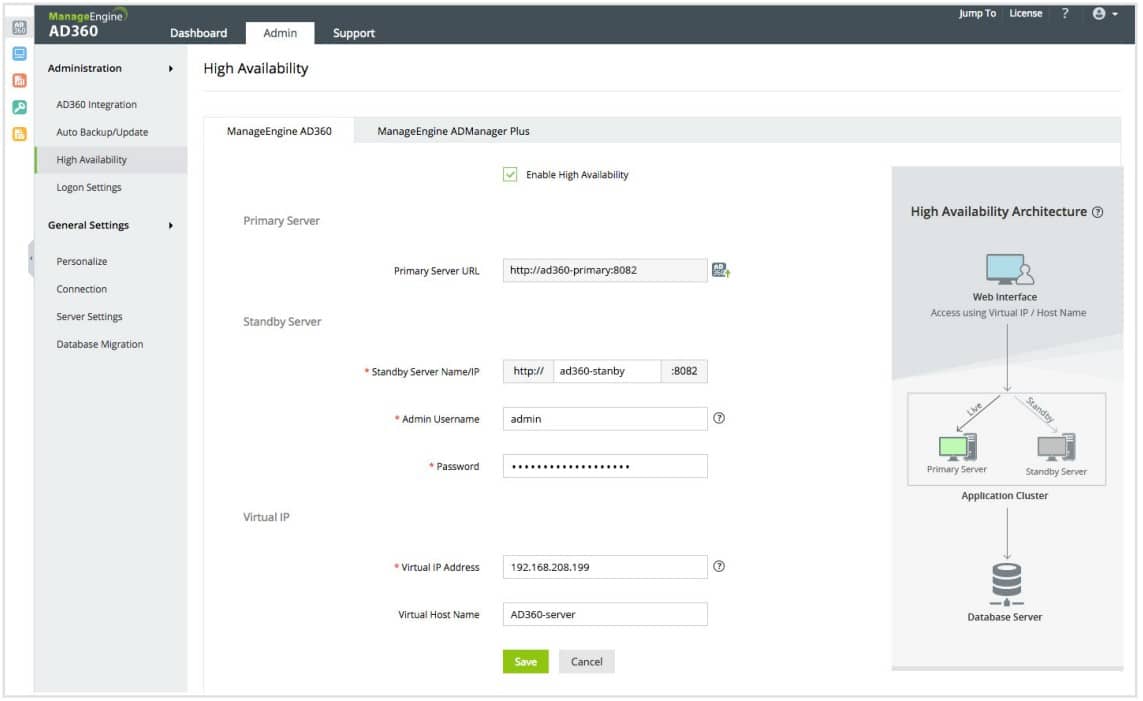
AD360 is a bundle of ManageEngine tools that supply a unifying frontend for all AD instances and the group of functions also includes RecoveryManager Plus, which you can use to backup Active Directory.

This system provides object-level backups for AD domain controllers on your site, for Azure AD, and for Microsoft 365 and its components, such as Exchange Server. The system lets you store several aged copies, so you can choose which timestamp to roll back to – that is a great feature that guards against your latest backup image getting corrupted.
Take a look at AD360 with a 30-day free trial to understand how third-party AD backup tools work.
ManageEngine OS Deployer (FREE TRIAL)
ManageEngine OS Deployer – A convenient platform that allows administrators to deploy operating systems and capture images at scale.
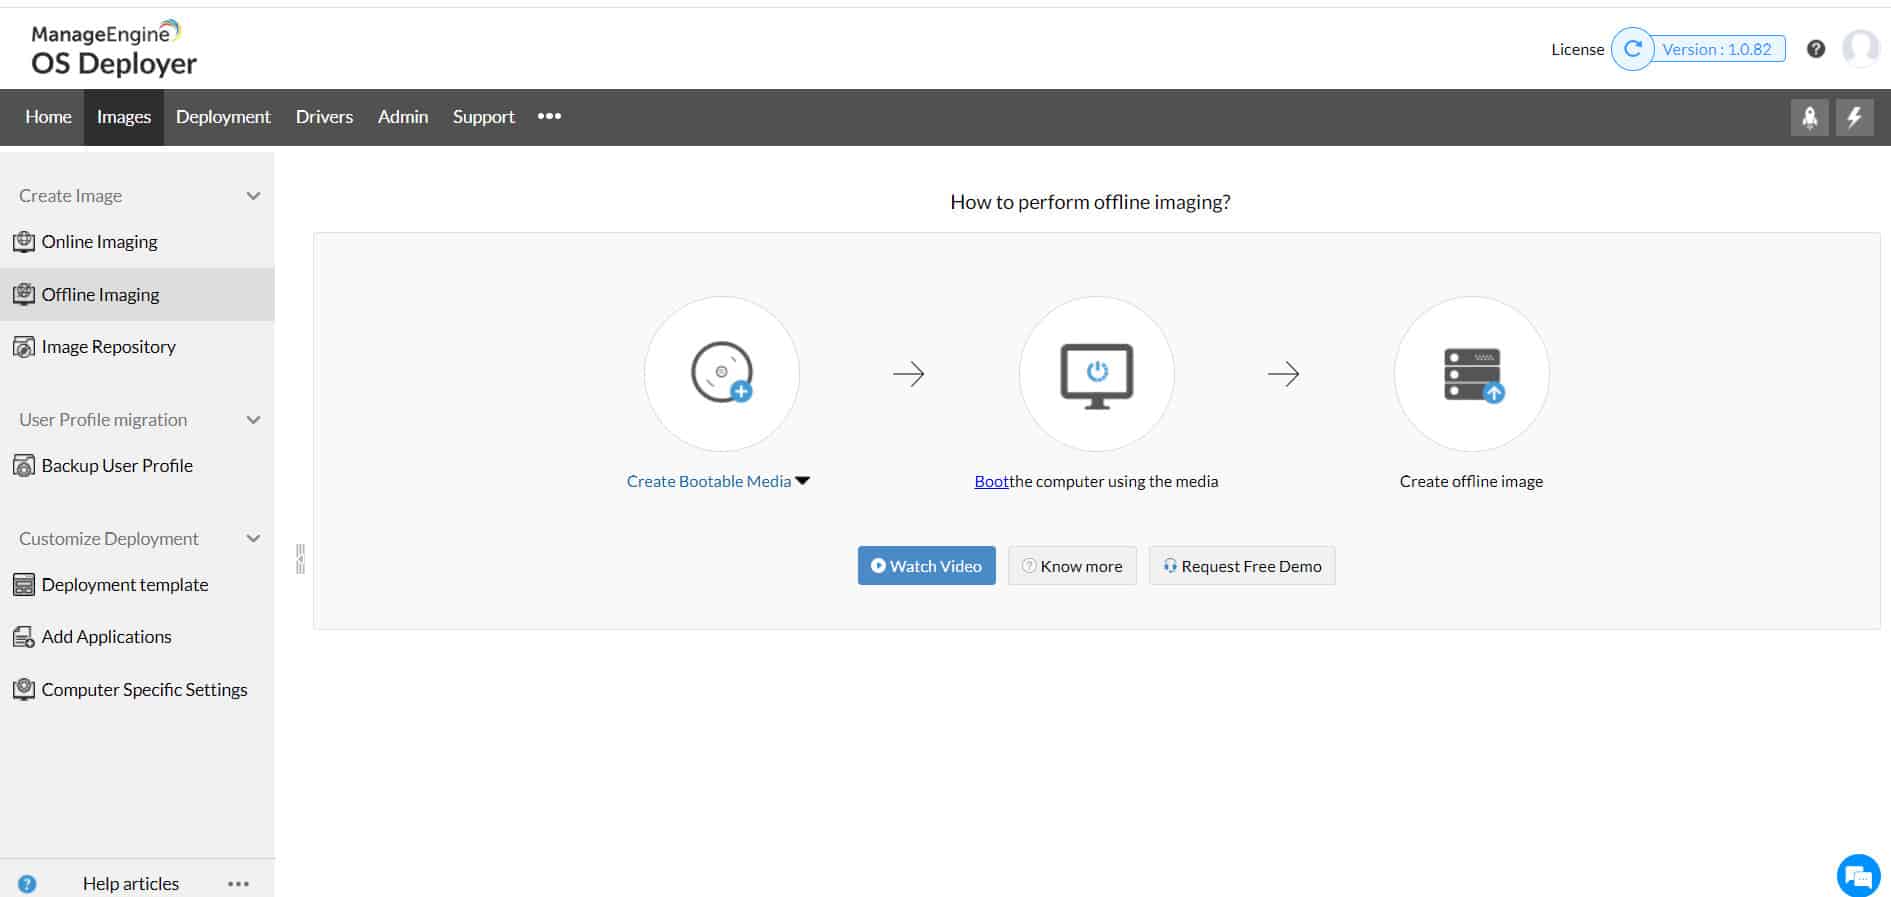
OS Deployer makes it easy to create custom images and replicate them across multiple machines at once. This is great for streamlining the PC upgrade process, or launching new remote offices. The platform gives you complete control over your images, allowing for hardware-independent deployments.
Key Features
- Independent hardware deployment
- Automated driver management
- User profile data migration
The application also offers built-in driver management to ensure each PC has matching drivers for a smooth deployment no matter what new hardware has been installed. For more dynamic environments, the platform offers live imaging to keep your master gold copies updated with the latest configurations and apps.
Pros:
- Offers intuitive imaging and deployment without sacrificing technical customizations
- Flexible pricing – a great option for enterprises as well as small businesses
- Supports remote office deployment, ideal for multi-site organizations
- Can deploy images regardless of hardware
Cons:
- The tool is designed for sysadmin; non-technical users may need to invest time learning the platform
Take a look at ManageEngine OS Deployer with a 30-day free trial.
Roundup
In this guide, you saw how to run a full system backup of Windows Server on a schedule and a system state backup executed manually. You can also run a system state backup on a schedule and a full backup manually – just switch between the two sets of instructions at the appropriate points.


