If you’ve grown comfortable with using the GUI in Active Directory (AD) then you might be a bit surprised to find that there is no good way to export AD group members with a few simple clicks or exporting options. Whether you need to export these members for an internal audit, or someone in HR needs it on their desk yesterday, PowerShell can help save the day.
In this article, we’ll dive into how you can export AD group members with PowerShell, as well as share a few other useful tricks and commands you can use along the way. Let’s get started.
Installing PowerShell
If you’re already on a Windows Server chances are you already have PowerShell installed. To launch PowerShell simply press Windows Key +R and type ‘powershell’ ( with no quotation marks) into the Run box. Then press Enter.
If PowerShell is installed you should see the PowerShell module on your screen. If it cannot be found, you might need to install the module first. This is pretty straightforward and can be done directly from the Server Manager. Let’s run through how to install PowerShell from scratch from Windows Server.
- Open Server Manager then click on Add Roles and Features.
- Click Next until you see the Features section.
- Click on the Remote Server Administration Tools tab -> Role Administration Tools -> AD DS and AD LDS Tools.
- Enable the Active Directory module for Windows PowerShell.
- Next click on the Install button to begin the installation of PowerShell.
Alternatively, you can download and install PowerShell on your Active Directory Server directly from Microsoft.
Finding Your Group Name
If you don’t already know the name of the group your members are in, we’ll need to find it. Even if you think you know the name of the group this is still a good exercise to make sure you know what you’re exporting.
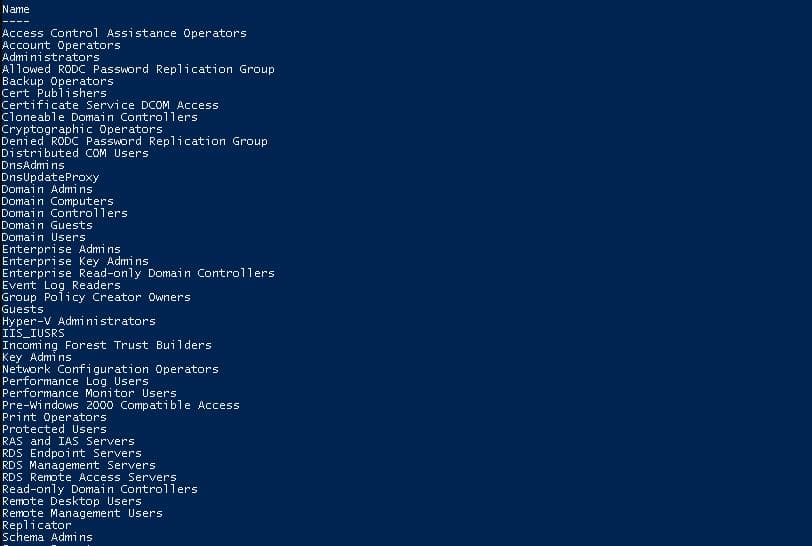
Run the following command to list all of the different Active Directory groups on your Domain Controller:
get-adgroup -filter * | sort name | select NameBelow you should see a bunch of different groups. If you didn’t remember creating these groups don’t worry, many of them are default groups already created by Windows.
After a bit of searching, you should see the group you’re looking for. Make a note of what the name of the group is. We’ll need this information for our next command.
Next, we’ll use the command below along with the name of the group to view all the members that are inside that group. Replace your group with the name of the group you’re looking for.
Get-AdGroupMember -identity "Your Group"After running that command you should see all of the names of the people who are inside your target group. You’ll also notice that there is additional information such as their Distinguished Name, Object Class, GUID, and SID.
You won’t necessarily need all of this information, but it’s good to make a mental note now that you know this command, especially for finding the SID.
If you want a cleaner output on your screen you can use the following command to only list names and prune out that additional account information:
Get-AdGroupMember -identity "Your Group" | select name
Exporting AD Group Members To CSV From PowerShell
The next step is exporting this information to a readable and shareable format. For this PowerShell can export to CSV. You cannot export directly to Microsoft Excel, but since CSV format is universal this formatting will work for Microsoft Excel, Open Office, and Google Sheets.
To save your results use the following command:
Get-AdGroupMember -identity "Your Group" | select name | Export-csv -path C:\groupmembers.csv -NoTypeInformation
The above command takes the members from the “Your Group” AD group and exports those members to a CSV file named groupmembers.csv located in the root of your C drive.
In more complex Active Directory environments you can use additional filters to help your search. While many won’t need these filters they’re handy to know in case you find yourself searching in a large enterprise-sized network.
You can use the GroupCategory filter to refine your search and tell PowerShell to only return results if they fit in a certain group. For this example, we only want to be looking into Security Groups, and don’t want other types of objects in our search.
Get-ADGroup -Filter 'GroupCategory -eq "Security"'If you find that your group structure is nested, meaning you have groups inside of your groups, your search may not return the names of the members. If this happens and you only see the names of the nested groups, you’ll have to use the –recursive syntax to enumerate all of the members and have them added to the list. To do this run the following command.
Get-ADGroupMember -identity “Your Group” -recursive | select name | Export-csv -path C:\groupmembers.csv -NoTypeInformationLastly, don’t forget that if you find yourself running this command periodically you can set it up to run automatically through Task Scheduler, and change the export path to a shared network drive.
Using ManageEngine ADManager Plus to Export AD Group Members
An easier way to export AD group members is through an automated AD management tool called ManageEngine ADManager Plus. This tool makes it easy to add and delete users, manage user permissions, reset passwords, perform updates on bulk users, restore deleted users, move users to a different OU, and more. All these actions can be done through an intuitive console, with just a few clicks. No PowerShell scripts are needed. Start a 30-day free trial.
Conclusion
PowerShell is a great tool when you get to spend some time learning how to use it. As your search queries become more complex you’ll find that the GUI in Active Directory alone won’t help you find what you’re looking for. If you know your way around PowerShell you can knock out tasks in AD much more quickly than through the GUI anyway.
Alternatively, a great free tool that can manage users in AD is the Admin Bundle by SolarWinds. This handy tool can help manage inactive accounts, and produce simple reports, just like the one we did in PowerShell. If you’re a sysadmin who’s looking to shave off wasted time in AD, I’d highly recommend it.
Frequently Asked Questions
Is PowerShell free?
Yes, PowerShell is a free Windows utility.
Does it matter which version of Windows Server I am running?
No, every modern version of PowerShell since Windows 7 and Windows Server 2008 R2 should be able to run these commands.
How do I export group members in Azure AD?
You should be able to run this same command in the Azure Active Directory PowerShell tool.