Network simulators are one of the key ingredients of training for the CCNA. There are few network simulators as widely used as Cisco Packet Tracer. Packet Tracer has been a staple tool of CCNA students ever since it was released. With Packet Tracer, you can imitative a live networking environment.
For instance, the user can design and interact with network topologies comprised of Cisco devices. Through building networks and “troubleshooting” on Packet Tracer users can start to build their knowledge of networking before working on a live network. There are also a range of tutorials, tips and help topics to help users learn the basics of the OSI model.
If you’re preparing to take the CCNA, then Packet Tracer will help you to take that first step towards “hands on” experience. Configuring routers and switches will be just some of the skills that you learn when using the program. In this article we’re going to look at what Packet Tracer is and how you can use it to configure a router.
Why Do I Need to Use Packet Tracer?
Completing Practice Labs and Preparing for Cisco Certification
Packet Tracer is an important tool because it is an essential part of preparing for networking exams like the CCNA. Cisco certifications like the CCNA require candidates to complete practice labs, virtual environments that imitate a live networking environment.
Tools like Packet tracer are used for practice labs and help students to take their book learning and apply it to a real-time environment. Being able to design networks with topology elements like nodes, routers and cables teaches the user how networks are made.
Having the technical expertise to construct and maintain networks in a virtual environment is essential for passing the exam. The more practice you have on network simulators like Packet Tracer, the greater the chance of achieving certification.
Network Design
Packet Tracer is used by some network administrators to design networks. Creating topology guides with a tool like packet tracer is preferable to using pen and paper because you can add and remove new features without having to scribbe anything out and start from scratch!
Testing Out Changes in a Safe Environment
Cisco Packet Tracer is also used by professional network administrators for testing network changes. Before changing a network the user can try out new topology changes to see if everything works correctly. If there aren’t any hiccups then the changes can be deployed in a live network.
How to Download Cisco Packet Tracer
One of the biggest advantages of Cisco Packet Tracer is that it is a free tool. However, it is only available to members off the Cisco Networking academy (updates can also be accessed via the Cisco.Netacad.net login portal). As a result if you want to download Packet Tracer you will need to enroll in one of their courses. Once you’ve done that you’ll need to take the following steps:
- Click ‘Enroll to Download Packet Tracer’
- Enroll in the Introduction to Packet Tracer course
- Finish registration for the Networking Academy registration
- Start the Introduction to Packet Tracer courser
- Follow the download instructions
Packet Tracer can be downloaded via Windows and Linux. More information can be found via this link here. Once you’ve downloaded Packet Tracer, follow the setup wizard instructions to complete the installation.
What if I’m Not Part of the Cisco Networking Academy?
As mentioned above you can either sign up for a course, look for another means of downloading packet tracer or use another alternative tool. There are a number of other alternative network simulation tools that provide a similar service. At the end of this article we’re going to look at some of the best alternatives to packet tracer you can use instead.
Configure a Router with Packet Tracer
Once you’ve installed Packet Tracer, one of the first things you’re going to want to learn is how to configure a router. However before you start doing that, take 30 minutes to become familiar with the user interface and the various elements you can add to the topological canvas.
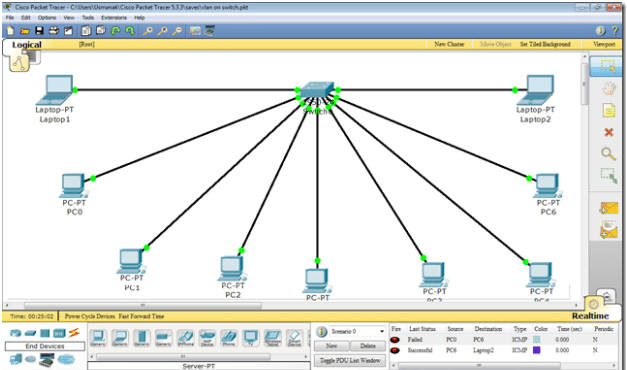
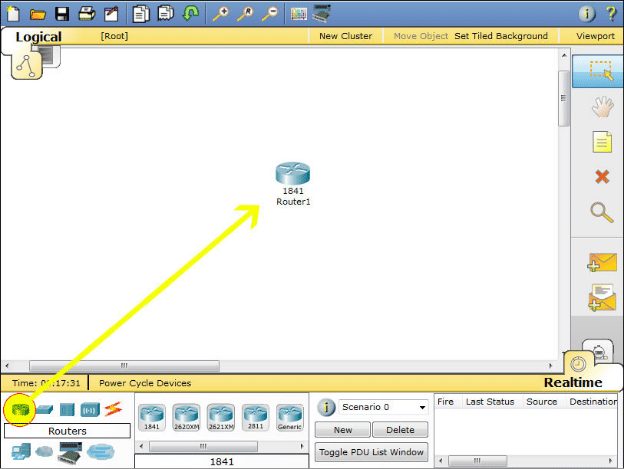
To begin configuring your router open Packet Tracer and select the router from the bottom left-hand corner. Drag the router into the centre of the canvas.
Next we’re going to set up a basic network that allows two computers to communicate with each other. Now you need to select end devices from the bottom left-hand corner and drag the PC icon into the main canvas. Add two computers and position them below the router on the canvas.
At this point, we’re going to connect the devices with cables. To connect routers and computers together you need to use a crossover cable. Select connections from the bottom left-hand corner, then go to the second second menu from the right at the bottom of the screen and select copper cross-over cable. Now click on Router0 and connect the cable via FastEthernet0/0:
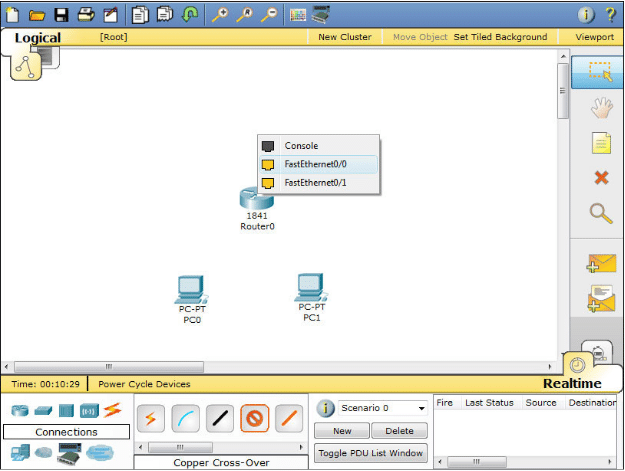
Once you’ve done this, click PC0 and select FastEthernet. A link will be established between the two devices. However, the link isn’t functional yet. You can see this clearly from the red dots on each side of the cable. Once the connection is established successfully the red dots will turn green to show the communication is successful.
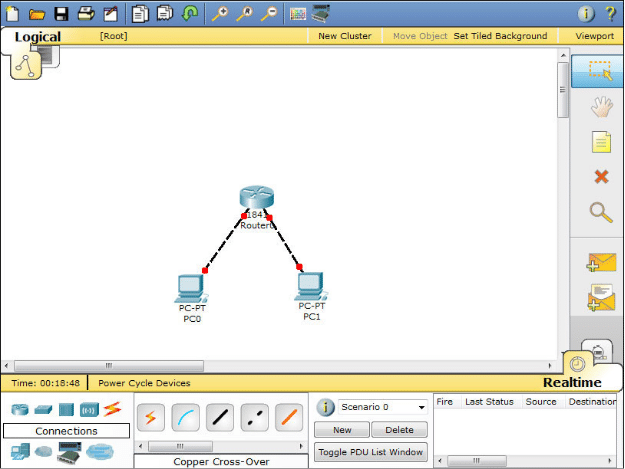
Now link PC1 and connect the cable to FastEthernet0/1 (Don’t try to use FastEthernet0/0 because it is already being used by PC0. Your network should look like the following image:
Configuring the Router
At this point, the router still needs be turned on. To setup the router, click on the router icon so that the configuration menu is raised. Here you will need to verify that the router is turned on. If the router is on there will be a small green light below the switch:

The next step is to open Ethernet ports to allow communication. Currently they are physically connected by inactive in a state referred to as administrative shut down. Click on the CLI tab to raise the configuration menu. The configuration menu acts the same as Cisco IOS:
- Press RETURN to start the session
- Type enable to activate privileged mode (this gives you more options in configuring the router)
- Type config terminal (or config t for short) to access the configuration menu.
- Type interface fastethernet0/0 to access Ethernet0/0.
- Type IP address 192.168.10.1 255.255.255.0 to assign an IP address and subnet mask to the interface.
- Type no shutdown to finish.
After following these steps, you should see the following message:
%LINK-5-CHANGED: Interface FastEthernet0/0, changed state to up
%LINEPROTO-5-UPDOWN: Line protocol on Interface FastEthernet0/0, changed state to up
Now we have to repeat the process for fastethernet0/1 to activate the connection to PC1. Remember to enter a different IP address!
- Press Ctrl + Z to go back to the previous mode
- Type interface fastethernet0/1
- Type IP address 192.168.20.1 255.255.255.0
- Type no shutdown
Once you have completed these steps, the router is configured! However, if you run a ping test you will find that the computers don’t communicate.
Configure the Gateway In Packet Tracer
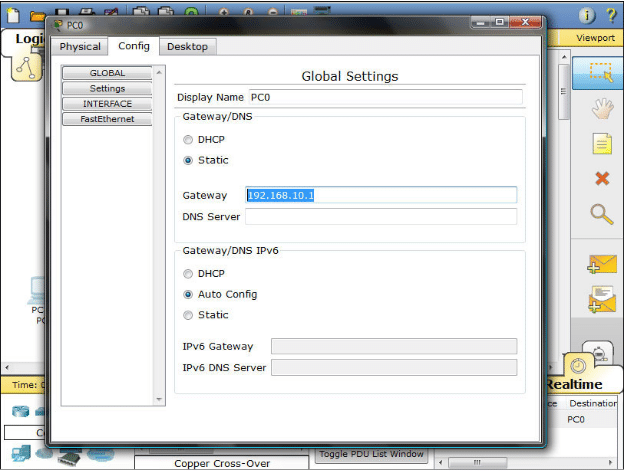
The final step is to configure the gateway on each desktop computer. The gateway is the address assigned to the Ethernet port that the desktop is connected to. The gateway allows the computer to interface with another network, and ping tests won’t work without it!
Click on PC0 to view the configuration menu. Go to global sendings and find the gateway field. In the gateway field, enter the IP address of the router’s interface, which is 192.168.10.1.
Next click the FastEthernet tab in the left-hand column to set the computer’s IP address on the network. Enter 192.168.10.2 for the IP address and 255.255.255.0 for the subnet mask.
Repeat the process for PC1 but use 192.168.20.1 for the gateway address, 192.168.20.2 for the IP address, and 255.255.255.0 for the subnet mask.
To confirm that the network works you can send packets from PC0 to PC1 and PC1 to PC0. To do this you need to click the packet icon (the envelope icon) from the menu on the right hand side of the screen:

Now click on PC0 and PC1. At the bottom right hand of the screen you should see a message box that says “Successful”. If the connection isn’t a success double check the IP address or router configuration commands you entered earlier. Syntax errors can often cause connections to fail.
Once you’ve complete all these steps, you will have a functional network. While this is a limited topology with two computers and enterprise networks are considerably more complex, this will help to teach you some basic principles that you can take with you when managing larger networks.
Alternatives to Packet Tracer
There are a number of competitors to Packet Tracer that are worth considering. The three main competitors are: Boson’s Netsim, Dynamips and GNS3.
Boson’s Netsim
Netsim is the only one of these alternatives that isn’t open source. NetSim is designed specifically for Cisco Certification training, with topology creation and the ability to share labs and topologies with the NetSim community. The price of Netsim varies depending on the package you want. In total there are three packages available to purchase;
- NetSim for CCENT $99 Single User License with 98 CCENT Labs
- NetSim for CCNA $179 Single user License 98 CCENT Labs and 73 CCNA Labs
- NetSim for CCNP $349 Single User license 98 CCENT Labs, 73 CCNA Labs, 145 CCNLP labs
You can view more information on the pricing options of NetSim via this link here.
Dynamips
Dynamips is a network simulation program that was designed specifically to help imitate Cisco devices. Dynamips is available for Windows, Mac OS and Linux. You can download it for free via this link here.
GNS3
GNS3 or Graphical Network Simulator is another network simulation tool that can be used to prepare for Cisco certifications. GNS3 is open sourced and available for Windows, Mac and Linux. GNS3 can be downloaded for free via this link here.
Packet Tracer: A Rite of Passage
Packet Tracer can be difficult to get used to when you’re starting out. While it may seem simple to add new topology elements if your networking knowledge is lacking then you’re going to have a steep learning curve. The more time you spend on Packet Tracer the more fluent you will become with running network simulations and troubleshooting.
Becoming familiar with a tool like Packet Tracer is an important intermediary step in preparing to monitor an enterprise-grade network. To many network administrators, Packet Tracer is a rite of passage. Learning how to configure a router in Packet Tracer will put you on the road towards become a competent and battle-tested network administrator.