
This guide will walk you through the steps to setting up a working Cisco switch from factory fresh to fully functioning. It is intended for network administrators and so includes all of the necessary security steps you’ll need to ensure your integrated switch is safely installed on your network.
The guide also presumes you’re working from a brand new Cisco switch. If you’re working from a pre-configured switch, you can probably skip through some of these steps.
During the setup process, you’ll be entering many commands into the switch via a CLI. If you’re familiar with CLI interfaces, this should be easy enough for you; but if you’re not familiar with CLI interfaces, then always remember these two simple tips:
- The tab key is your best friend
By pressing the tab key while typing commands, you can auto-complete most of the longer words and phrases. Not only does this save you on typing, but it also cuts down massively on spelling errors. - If in doubt, use ‘?’
By adding a question mark (?) to the end of a command, you can produce a list of possible variables with simple instructions on what each order does. So if you’re ever stuck on how to format an input or what options you have available, try using ‘?’.
Connect to the Switch via PuTTY
First, you’ll need to connect to the device to open the configuration CLI and commit changes. The best piece of software to achieve this with is PuTTY, a free, open-source tool that provides you with the capabilities to connect to your Cisco switch and send commands.
Download and install the software, and get your hands on a 9-pin serial to USB cable to physically connect to the device via a laptop or desktop. Once you’re plugged in, open PuTTY on your machine.
For the category, select Serial on the left.
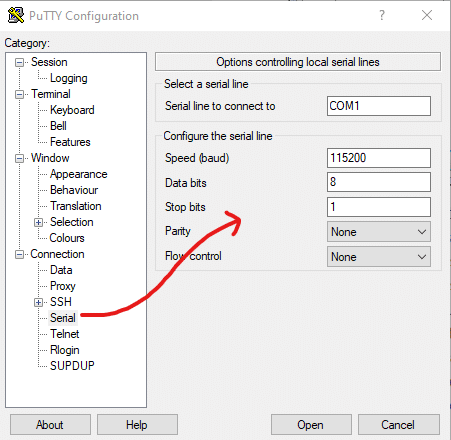
You’ll need to configure your settings similar to the screenshot shown above.
To determine the ‘Serial line to connect to,’ you can identify the correct COM port via device manager. Enter the correct COM port in the first text box.
For the other information, you can typically copy the screenshot. To give you a breakdown of what this information means:
- The ‘Speed (baud)’ determines the digital transmission speed, which must be compatible with the switch. For the 300 and 500 managed switch series, the speed is always 115200 – if you’re using a different switch series, you’ll need to find the information yourself.
- ‘Data bits’ and ‘stop bits’ are used to determine the frame size of each character. This is typically a rate of 8 data bits and one stop bit – we don’t recommend changing this unless you know what you’re doing.
- Parity and flow control determine the method which PuTTY uses to detect transmission errors and prevent data overflow. But, again, unless you know what you’re doing, you’ll want to make sure these are both set to ‘None’ to configure a Cisco-managed switch.
Save your PuTTY Settings (Optional)
Once you have established the above settings, you’ll probably want to save them for future use and prevent you from reentering the same information repeatedly.
To do this, navigate back to the Session category on the left.

Enter the information as it matches whatever you entered during the previous stage. Namely, select ‘Serial’ from the options available and enter the correct COM port and Speed (115200).
Then, you can enter a name for the configuration under the ‘Saved Sessions’ text box and then click Save to store that configuration for future use. Note that you might occasionally need to change your COM port, primarily if you use a different serial cable.
Once you’re ready, click Open to connect to the switch via the CLI. You may also have to hit enter once to trigger the CLI to refresh.
Enter Privileged EXEC Mode
If you’re configuring a switch with the factory default settings, you may first be prompted to enter the initial configuration dialog.
% Please answer ‘yes’ or ‘no’
Would you like to enter the initial configuration dialog? [yes/no]
In this circumstance, you’ll want to enter ‘no’ – this guide will help you walk through everything you need to set reentering. The initial configuration dialog performs several things we don’t typically need to set up.
You’ll then receive your first prompt, which should look something like this:
Switch>Note the greater than sign (>) listed after the hostname. This indicates that we’re in User EXEC Mode which only provides you with essential monitoring functions. We need to enter Privileged EXEC Mode to perform the initial configuration properly.
To enter Privileged mode, simply enter:
Switch>enYou’ll notice that the greater than sign (>) has changed to a pound or hashtag sign (#). By entering ‘en’ into the CLI (which is short for ‘enable’), we enable Privileged EXEC Mode. Now, you have the authority to perform changes on the device.
Enter Global Configuration Mode
We’re not ready to start committing changes yet. There’s still one more mode we need to activate, which is Global Configuration Mode. While Privileged mode gives us the authority to make changes, Global Configuration Mode enables the commitment of the changes.
To enter Global Configuration Mode, enter the following:
Switch#configure tIn this circumstance, ‘t’ is short for a terminal. You’ll receive a prompt which informs you that you can now enter configuration commands. It will also notify you that you can end Global Configuration Mode by pressing CTRL + Z – though this will not save any of your changes.
Set the Hostname
Next, you’ll want to set the hostname from something other than simply ‘switch.’ This is important to ensure the device is identifiable on your network. Finally, plan for any new switch installations and establish a naming convention for all of your switches.
To define a new hostname, enter the following:
Switch(config)#hostname switch01Where ‘switch01’ is an example hostname, you should notice the hostname will change within the CLI to reflect this change.
Configure a Management IP
For future configuration purposes, you’ll need to assign the switch with an IP address that you can connect to via Telnet or SSH without the need for console access via the cable. You’ll need to assign this IP address to a vlan, which you can do as follows:
switch01(config)#int vlan 1This enters the configuration for the specific vlan interface (‘int’ is short for interface). You’ll notice the prompt on the screen adjust to say ‘config-if,’ which highlights that you are now modifying the interface.
Then, enter the following:
switch01(config-if)#ip address 192.168.1.6 255.255.255.0Where ‘192.168.10.6’ is the example IP address, and ‘255.255.255.0’ is the example subnet. Once set, this will be the IP address you connect to when performing administration on the switch. You’ll now want to back out of modifying the interface to continue making changes to the switch, which you can do so with the ‘exit’ command as follows:
switch01(config-if)#exitThe prompt will change back to simply say ‘config’ to indicate you’ve backed out of the interface.
Assign a Password to the Switch
As mentioned previously, Privileged EXEC Mode grants you authority to enter the configuration mode and make changes. Therefore, you need to secure a Privileged mode behind a password to prevent unauthorized changes to your network configuration.
You can do so with the following command:
switch01(config)#enable secret 0 p@ssw0rd1Where ‘p@ssw0rd1’ is an example password, you can, of course, enter whatever password you desire. The ‘0’ that you enter defines the password as an unencrypted entry. Using the command:
switch01(config)#enable secret?It will give you more information about setting up an encrypted password or defining a password for each given EXEC level.
Configure Telnet and Console Access Passwords
In addition to securing your Privileged EXEC Mode, you’ll also need to ensure your switch from Console, Telnet, or SSH access with password protection.
First, enter Telnet/SSH configuration via the following commands:
switch01(config)#line vty 0 15‘Vty’ indicates virtual teletype, which effectively covers SSH and Telnet connections. The 0 and 15 show the maximum number of virtual connections. In other older guides, you may see reference to ‘0 4’, which is also valid.
Then enter the following:
switch01(config-line)#password p@ssw0rd1switch01(config-line)#loginswitch01(config-line)#exit
Where ‘p@ssw0rd1’ is an example password, you can, of course, enter whatever password you desire. Once you’ve set that, you can move onto the console password.
Then enter the console configuration as follows:
switch01(config)#line console 0switch01(config-line)#password p@ssw0rd1switch01(config-line)#loginswitch01(config-line)#exit
Where ‘p@ssw0rd1’ is an example password, you can, of course, enter whatever password you desire. This will enable the assigned password and exit back to the configuration, ready to continue with additional commands.
Limit IP Addresses with SSH/Telnet Access (Optional)
For an additional layer of security, you can also limit the IP addresses that access the switch on your network. First, you need to define an access control list (ACL), which you can do with the following commands:
switch01(config)#ip access-list standard acl_telnetswitch01(config-std-nacl)#permit 192.168.1.0 0.255.255.255switch01(config-std-nacl)#exit
Where ‘acl_telnet’ is the example name for the access control list. ‘192.168.1.0 0.255.255.255’ is the example IP and wildcard subnet range you wish to add to this access control list. This is useful if you have a specific administration subnet; alternatively, you can enter a particular IP address and ignore the wildcard subnet mask.
Note that the subnet is a wildcard mask, hence why it appears reversed from what you might typically expect if you’re not familiar with subnetting.
You then need to apply this ACL to your switch. You do this in the same way that you applied a password; the command is as follows:
switch01(config)#line vty 0 15switch01(config-line)#access-class acl_telnet inswitch01(config-line)#exit
Assign a Default Gateway to the Switch
To allow the switch to direct traffic within your network, you’ll need to assign a default gateway. This will be the IP address of the next hop in your network, which will almost certainly be the IP address of your router.
You can do this with the following command:
switch01(config)#ip default-gateway 192.168.1.1Where ‘192.168.1.1’ is an example IP address of the default gateway.
Disable Unused Ports (Optional)
You may also wish to go even further with your security and disable all unused ports on the switch. This is an excellent habit to develop, as open ports can be used to breach your network security.
To do so, enter the following commands:
switch01(config)#interface range fe0/5 - 25 switch01(config-if-range)#shutdownswitch01(config-if-range)#exit
Where fe0/5-25 is the example port range that you wish to shutdown. By deactivating these ports, you prevent all access to them, so make sure you select the correct ports as you may suddenly discover you can no longer access the switch once you commit the changes.
Save Your System Configuration Settings
Once you’ve set all of your desired settings as instructed by our guide, you’ll want to commit the configuration. Currently, the settings you’ve defined have not been applied and won’t be executed until you instruct the switch to do so.
To do so, enter the following:
switch01(config)#exitswitch01#wr
This exits from Global Configuration Mode and commits the changes by writing them (‘wr’) to the switch.
Testing the Switch
Now that you’ve committed the changes, your switch will be configured to function on your network if you followed through with our guide in its entirety. You can test this by connecting it into your network as you planned and jumping onto a device that can access the switch (within any IP range defined by your ACL).
First, simply try pinging the management IP from within your network using the command prompt. You can also try pinging it from different points in your network to ensure that it works properly.
Next, you’ll want to try connecting via Telnet. You can telnet via PuTTY if you have it installed on the admin machine, or you can also telnet simply using cmd.
First, make sure that you have the telnet function installed by entering the following into cmd:
Dism /Online /Enable-feature /FeatureName:TelnetClient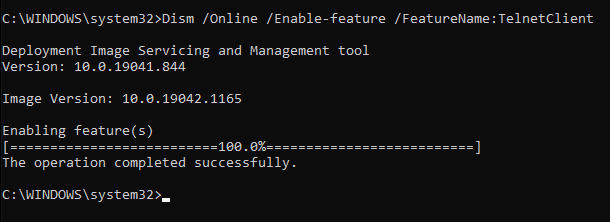
This will enable you to telnet to the switch via cmd. To do so, simply use the ‘telnet’ command followed by the management IP address.
Once you have connected via telnet, you can test the login credentials that you set up. You’ll need to enter the telnet access password you created, and you can also try to enter privileged EXEC mode to test the ‘secret’ password you set.


